Getting Started
CAUTION: Active Development
This documentation is a work in progress. The installation steps and usage instructions may change as the package evolves. Use them as a temporary guide for testing and exploring the current development state.
Requirements
- Laravel: 10 or higher
- PHP: 8.1 or higher
Installation
Follow these steps to install LaradminLTE in your Laravel application:
1. Install the Package
Use Composer to add the package to your Laravel project:
composer require dfsmania/laradminlte:^1.0@beta2. Publish Required Package Resources
Run the following commands to publish the basic package's assets and configuration files:
php artisan vendor:publish --tag="ladmin-assets" --tag="ladmin-config"This command will publish the following elements to your application:
- Assets: The set of AdminLTE v4 distribution files (
CSS,JS) and some images in thepublic/vendor/ladminfolder of your Laravel application. - Config: The package configuration files in the
config/ladminfolder of your Laravel application.
3. Other Publishable Resources (Optional)
Translations
Additionally, you can also publish the translation files if you want to customize them or add new languages:
php artisan vendor:publish --tag="ladmin-translations"Translation files will be published to the resources/lang/vendor/ladmin folder of your Laravel application.
Migrations
If you plan to use the built-in authentication scaffolding with the profile images feature, you should publish the package's migrations:
php artisan vendor:publish --tag="ladmin-migrations"Migrations will be published to the database/migrations folder of your Laravel application. These migrations will create the necessary columns on the users table to support user profile images. You can run migrations by executing:
php artisan migrateUsage
Follow these steps to use, configure and test LaradminLTE in your Laravel application:
1. Create a Dedicated Route and View
Set up a route in your routes/web.php file, for example:
Route::get('ladmin_welcome', function () {
    return view('laradminlte-welcome');
});
Next, create a Blade view to test the package's functionality. The package provides a main blade component that should be used to render the full admin layout. As example, save the following content in resources/views/laradminlte-welcome.blade.php:
<x-ladmin-panel title="Welcome">

    {{-- Setup the content header --}}
    <x-slot name="contentHeader">
        <div class="row">
            <div class="col-12">
                <h3 class="fw-bold">
                    <i class="bi bi-heart-fill text-danger"></i>
                    Welcome to LaradminLTE!
                </h3>
            </div>
        </div>
    </x-slot>

    {{-- Setup the content body --}}
    <div class="row">
        <div class="col-12">
            <i class="bi bi-rocket-takeoff-fill fs-5 text-primary"></i>
            Now, start building your next administration panel with ease and flexibility.
        </div>
    </div>

    {{-- Push inline scripts if needed --}}
    @push('js')
        <script>
            console.log('LaradminLTE is successfully loaded!');
        </script>
    @endpush

</x-ladmin-panel>- The
titleattribute of the main component sets the page title, which is automatically appended to your application's name and shown in the browser's title bar. - The
contentHeaderslot is used to define the header section of the content area. - The content body is placed directly within the main component tags (as the default
slotof the component). - The
@push('js')directive allows you to add custom JavaScript code that will be included in the layout. - The
@push('css')directive can also be used to add custom CSS styles if needed.
2. Enable the Authentication Scaffolding (Optional)
IMPORTANT: Users Migrations Required
To use the authentication scaffolding, you need to have the default Laravel's migrations for users already set up in your database. If this is not your case, then you can can install Laravel's default migrations by running: php artisan migrate.
If you want to use the built-in authentication scaffolding, make sure to have it enabled in the config/ladmin/auth.php file, and setup the home_path. The home_path is the place where users will be redirected after login. Then protect your routes using the auth middleware:
// config/ladmin/auth.php:
'enabled' => true,
'home_path' => '/ladmin_welcome',// routes/web.php:
Route::middleware(['auth'])->group(function () {
Route::get('ladmin_welcome', function () {
return view('laradminlte-welcome');
});
// Add other protected routes here...
});After this, all the routes within this group will require authentication to be accessed.
3. Test your Route/View
To test the admin panel, you first need to ensure that your Laravel application is running. You can start the development server using the following Artisan command:
php artisan serveThen, just open your browser and navigate to:
http://your-app.test/ladmin_welcomeReplace your-app.test with your local development URL. If authentication is enabled, a login screen will appear. Then, you should see the default admin layout rendered using the package’s out-of-the-box configuration:
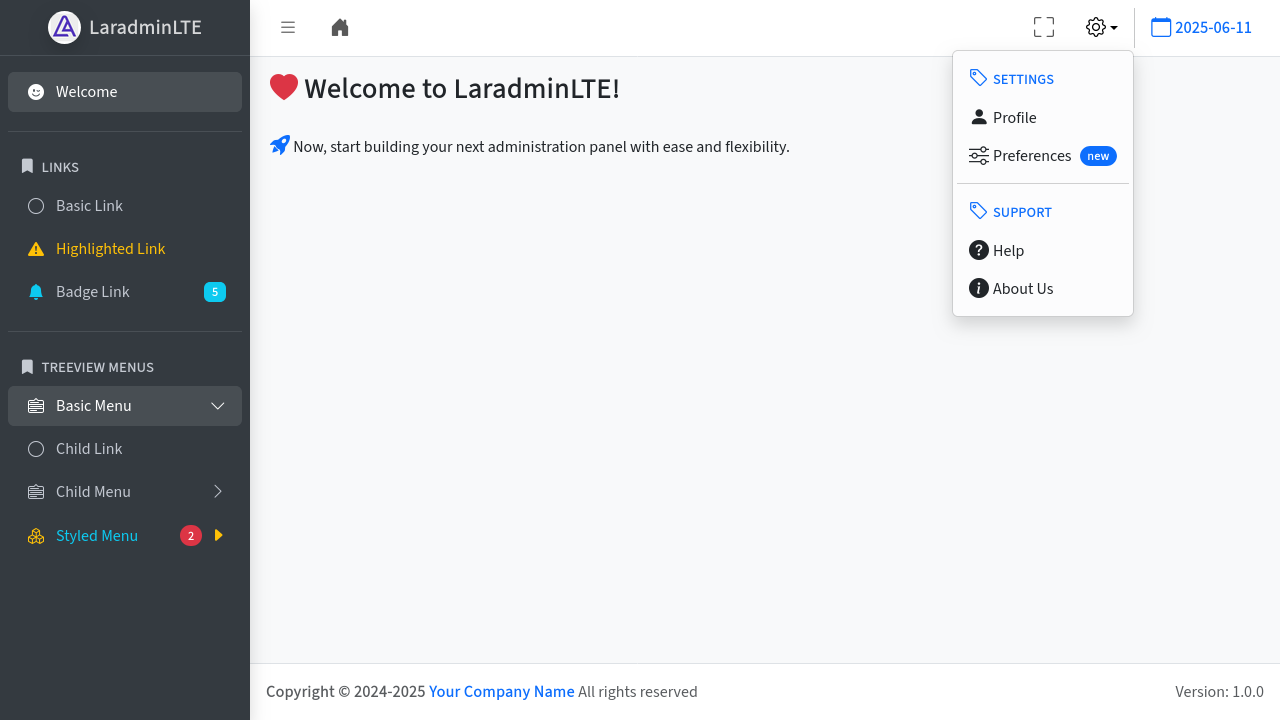
Finally, to define your admin panel menu entries, you can edit the config/ladmin/menu.php file. This file allows you to customize the sidebar and navbar menu structure and items according to your application's needs. Remember that each new menu entry that renders a page should provide a blade view that extends the main layout component (<x-ladmin-panel>) to ensure the admin layout is applied correctly.
4. Customize Configuration
Explore and modify the package's configuration files to suit your needs:
config/ladmin/main.php: General settings for the admin panel.config/ladmin/menu.php: Define the menu structure.config/ladmin/plugins.php: Manage plugins and extensions.config/ladmin/auth.php: Configure authentication scaffolding.
Updating
To update LaradminLTE to the latest version, just run the following command:
composer update dfsmania/laradminlteIt's recommended to always check the release notes and documentation for any breaking changes or new features before updating.
AdminLTE V4 Assets
If the new version of LaradminLTE includes updates to the AdminLTE v4 assets, you may need to re-publish the assets to your application. You can do this by running:
php artisan vendor:publish --tag="ladmin-assets" --forceUpdating Configuration Files
If the new version of LaradminLTE introduces changes to the configuration files, you may need to update your existing configuration files. You can do this by re-publishing the configuration files:
php artisan vendor:publish --tag="ladmin-config" --forceCAUTION: Losing Configuration Changes
Be cautious when updating configuration files, as any custom changes you made may be overwritten. It's recommended to always back up your configuration files before updating. After updating, review the new configuration files and merge any necessary changes into your existing configuration, by using your backup as a reference.
Alternatively, you can manually check the differences between the new configuration files and your existing ones, and apply the necessary changes without overwriting your customizations. The package configuration files (latest version) can be found in the vendor/dfsmania/laradminlte/config directory of your Laravel application. So you can use a diff tool to compare the new configuration files with your existing ones and apply the necessary changes. For example, you can use the diff command in your terminal:
diff -u vendor/dfsmania/laradminlte/config/ladmin/main.php config/ladmin/main.phpOther Diff Tools
There are other diff tools available, such as Meld or Beyond Compare, which provide a graphical interface for comparing files and merging changes. With Meld, for example, you could compare the entire configuration directory of the package with your existing configuration directory by executing the following command:
meld vendor/dfsmania/laradminlte/config/ladmin config/ladmin