Authentication Scaffolding Configuration
These settings allow you to customize the appearance and features of the authentication scaffolding provided by LaradminLTE. The authentication scaffolding is built on top of the Laravel Fortify backend, which already includes routes and controllers for login, registration, password reset, and email verification features. LaradminLTE uses Fortify's backend to provide a complete authentication solution with pre-built views that can be easily customized.
The authentication settings are managed in the config/ladmin/auth.php file. If this file does not exist, you can publish it by running the following command in the root folder of your Laravel application:
php artisan vendor:publish --tag="ladmin-config"How to Use the Authentication Scaffolding
IMPORTANT: Users Migrations Required
To use the authentication scaffolding, you need to have the default Laravel's migrations for users already set up in your database. If this is not your case, then you can can install Laravel's default migrations by running: php artisan migrate.
If you want to use the built-in authentication scaffolding, make sure to have it enabled in the config/ladmin/auth.php file, and at least setup the home_path. The home_path is the place where users will be redirected after login. Then protect your routes that requires authentication using the auth middleware:
'enabled' => true,
'home_path' => /* Your home path here */,Route::middleware(['auth'])->group(function () {
// Add routes that require authentication here...
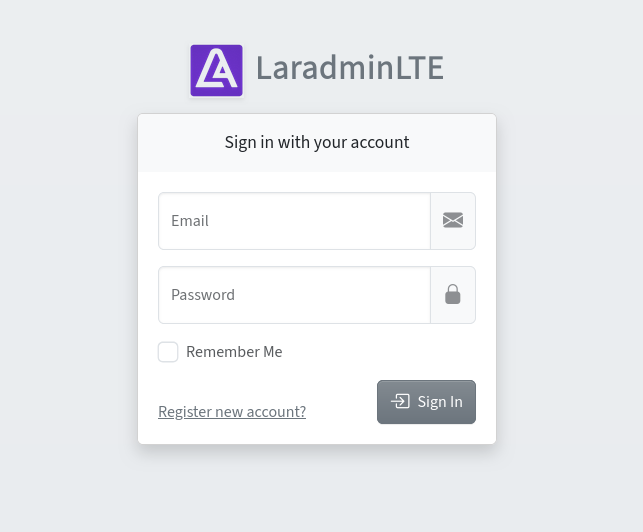
});Once you have done this, you can access the login page by navigating to /login in your application. Also, you will be redirected to the login page automatically when trying to access any protected route without being authenticated. In these cases, you should see a login form styled with the default LaradminLTE theme:
The authentication scaffolding offer additional features that can be enabled or disabled as needed. These features include registration, password reset and email verification among others. Also, the appearance of the authentication views can be customized by modifying the configuration file. All of these settings are explained in the next sections.
Main Settings
The main settings for the authentication scaffolding are as follows:
Quick Config Example
[
    'enabled' => true,
    'accent_theme' => 'default',
    'background_classes' => ['bg-body-secondary', 'bg-gradient'],
    'background_image' => null,
    'home_path' => '/home',
]enabled:
- Type:
boolean - Example:
'enabled' => true
This setting enables or fully disables the authentication scaffolding provided by LaradminLTE. When set to false, all of the authentication views and routes will be disabled. When set to true, the authentication scaffolding will be available for use with a minimal setup of features: login, logout and password confirmation. All of the other features may be enabled or disabled individually as needed.
accent_theme:
- Type:
string - Example:
'accent_theme' => 'blue'
This setting defines the accent theme used for the authentication pages. You can set this to any of the defined themes in the accent_themes section of the configuration file to change the color scheme of various elements on the authentication pages, such as buttons and links.
background_classes:
- Type:
array<string> - Example:
'background_classes' => ['bg-body-secondary', 'bg-gradient']
This setting allows you to define the CSS classes that will be applied to the <body> element of the authentication pages. You can use this to customize the background appearance of the authentication views.
background_image:
- Type:
string|null - Example:
'background_image' => '/images/auth-background.jpg'(relative path to public folder) - Example:
'background_image' => 'https://picsum.photos/id/194/1280/720'(absolute URL)
This setting allows you to specify a background image for the authentication pages. You can provide the URL or path to an image file, and it will be applied as the background of the authentication views. If set to null, no background image will be used, and the background color defined by the background_classes setting will be applied instead. When using a path, it should be relative to the public folder of your Laravel application.
home_path:
- Type:
string - Example:
'home_path' => '/home'
This setting defines the path where users will get redirected by default during authentication or password reset when the operations are successful and the user is authenticated.
Authentication Logo
The logo configuration section allows you to set and customize the logo displayed on the authentication pages.
Quick Config Example
'logo' => [
    'image' => '/vendor/ladmin/img/LaradminLTE-Auth.png',
    'image_alt' => 'LaradminLTE Logo',
    'image_classes' => ['shadow-sm', 'me-1'],
    'image_height' => '55px',
    'image_width' => '55px',
    'text' => 'LaradminLTE',
    'text_classes' => ['fw-bold', 'text-secondary'],
]image:
- Type:
string - Example:
'image' => '/images/auth-logo.png'(relative path to public folder) - Example:
'image' => 'https://example.com/auth-logo.png'(absolute URL)
This setting specifies the URL path to the logo image file. You can provide a relative path to the public directory of your Laravel application or an absolute URL.
image_alt:
- Type:
string - Example:
'image_alt' => 'My Application Logo'
This setting defines the alternative text for the logo image, which is used for accessibility purposes.
image_classes:
- Type:
array<string> - Example:
'image_classes' => ['shadow-sm', 'me-1']
This setting allows you to specify the CSS classes that will be applied to style the logo image.
image_height:
- Type:
string - Example:
'image_height' => '55px'
This setting defines the height of the authentication logo image.
image_width:
- Type:
string - Example:
'image_width' => '55px'
This setting defines the width of the authentication logo image.
text:
- Type:
string - Example:
'text' => 'My Application'
This setting specifies the text that will be displayed alongside the logo image.
text_classes:
- Type:
array<string> - Example:
'text_classes' => ['fw-bold', 'text-secondary']
This setting allows you to define the CSS classes that will be applied to style the logo text.
Authentication Features
The authentication scaffolding includes several features that can be enabled or disabled individually. These features are managed in the features section of the config/ladmin/auth.php file.
Quick Config Example
'features' => [
    'registration' => true,
    'password_reset' => false,
    'email_verification' => false,
    'profile_image' => true,
    'update_profile_information' => true,
    'update_password' => true,
    'browser_sessions' => true,
    'account_deletion' => true,
]
Take into account that some of these features may require additional configuration or setup to work properly. For example, the password reset and email verification features require you to have a mailing service configured in your Laravel application to send the corresponding emails to users. Details about these requirements are provided in the descriptions of each feature below.
Feature: Registration
- Type:
boolean - Example:
'registration' => true
This setting enables or disables the user registration feature. When set to true, users will be able to create new accounts using the registration form. When set to false, the registration routes and views will be disabled, preventing new user registrations.
Feature: Password Reset
- Type:
boolean - Example:
'password_reset' => true - Requires: A mailing service configuration.
This setting enables or disables the password reset feature. When set to true, users will be able to reset their passwords if they forget them. When set to false, the password reset routes and views will be disabled.
This feature requires you to properly configure a mailing service in your Laravel application, by setting the corresponding MAIL_* environment variables. This is necessary to allow the application to send password reset emails to users.
Mailing Service Configuration
Laravel supports various mailing services that you can use to send emails from your application, such as SMTP, Mailgun, Postmark, etc. At next, an example of the environment (.env) configuration using Mailtrap is provided for your reference.
Mailing Service Configuration with Mailtrap
MAIL_MAILER=smtp
MAIL_SCHEME=null
MAIL_HOST=sandbox.smtp.mailtrap.io
MAIL_PORT=2525
MAIL_USERNAME=/* Your Mailtrap username */
MAIL_PASSWORD=/* Your Mailtrap password */
MAIL_FROM_ADDRESS=noreply@app_name.com
MAIL_FROM_NAME="${APP_NAME}"
Feature: Email Verification
- Type:
boolean - Example:
'email_verification' => true - Requires: A mailing service configuration, the
MustVerifyEmailcontract on theUsermodel and theverifiedmiddleware on protected routes.
This setting enables or disables the email verification feature. When set to true, users will be required to verify their email addresses upon registration.
This feature requires you to properly configure a mailing service in your Laravel application, by setting the corresponding MAIL_* environment variables, you can see Mailing Service Configuration for an example of environment configuration using Mailtrap.
Additionally, you need to add the Illuminate\Contracts\Auth\MustVerifyEmail contract on your User model, and to add the verified middleware to routes that should only be accessible to verified users.
For further customization on the format of the email verification notification, check the official Laravel documentation on Email Verification Customization.
The MustVerifyEmail Contract
Laravel already handles email verification with default logic, so you don't need to create it manually. However, you do need to add the MustVerifyEmail contract on your User model to enable this feature. At next we provide an example of how to add the MustVerifyEmail contract in the User model.
<?php

namespace App\Models;

use Illuminate\Contracts\Auth\MustVerifyEmail;
use Illuminate\Foundation\Auth\User as Authenticatable;
use Illuminate\Notifications\Notifiable;

// Note the User model implements the MustVerifyEmail contract...
class User extends Authenticatable implements MustVerifyEmail
{
    use Notifiable;

    // ...
}
The verified Middleware
To restrict access to certain routes only to users with verified email addresses, you need to add the verified middleware to those routes. This middleware will check if the authenticated user's email address has been verified before allowing access to the route. If the user's email is not verified, they will be redirected to a page prompting them to verify their email. You can add the verified middleware to your routes as follows:
Route::middleware(['auth', 'verified'])->group(function () {
    // Add routes that require authenticated and verified users here...
});
Feature: Profile Image
- Type:
boolean - Example:
'profile_image' => true - Requires: Adding
profile_image_pathcolumn to users table, usingHasProfileImagetrait inUsermodel and setting up Laravel Filesystem.
This setting enables or disables the profile image management feature on the user profile page. When set to true, users will be able to upload and display a profile image. When set to false, the profile image functionality will be disabled. This feature requires a few steps to be fully functional, which are explained below.
Add profile_image_path Column to Users Table
This packages comes with a migration file that adds the profile_image_path column to the users table in your database. This column is used to store the file path of the uploaded profile image for each user. So, you need to publish this migration file by running the following command:
php artisan vendor:publish --tag="ladmin-migrations"And then, execute the migrate command to update your database schema:
php artisan migrateInclude the HasProfileImage Trait on User Model
Include the DFSmania\LaradminLte\Models\Concerns\HasProfileImage trait in your User model to add the necessary methods and relationships for handling profile images. For example:
<?php

namespace App\Models;

use DFSmania\LaradminLte\Models\Concerns\HasProfileImage;
use Illuminate\Foundation\Auth\User as Authenticatable;
use Illuminate\Notifications\Notifiable;

class User extends Authenticatable
{
    // Note the User model uses the HasProfileImage trait...
    use HasProfileImage, Notifiable;

    // ...
}
Setup Your Laravel Filesystem
This feature requires you to have the Laravel Filesystem properly configured in your application to handle file uploads. By default, the profile images are stored in the public disk, which is typically linked to the storage/app/public directory. Make sure to run the following command to create a symbolic link from public/storage to storage/app/public if you haven't done so already.
php artisan storage:linkCustomize Profile Image Settings (Optional)
You can customize the profile image settings in the config/ladmin/auth.php file under the profile_images section. This includes options such as the storage disk, maximum file size, allowed file types, and default image mode (i.e., the default image to use when a user has not uploaded a profile image). The default image uses external services like UI Avatars or Gravatar to generate placeholder images based on the user's name initials or the user's email. Details about these settings can be found in the Profile Images Configuration section.
Feature: Update Profile Information
- Type:
boolean - Example:
'update_profile_information' => true
This setting enables or disables the ability for users to update their profile information on the user profile page. When set to true, users will be able to edit and save changes to their profile details, such as name and email address. When set to false, the profile information update functionality will be disabled.
INFO: About Email Verification and Updating Email Address
Under the scenario where the email verification feature is also enabled, if a user updates their email address, they will be required to verify the new email address before it becomes active and can be used for authentication. In this case, the user will receive a new verification email at the updated email address, and they must click the verification link in that email to confirm the new address. During this process, the old email address won't be able to be used for authentication anymore.
Feature: Update Password
- Type:
boolean - Example:
'update_password' => true
This setting enables or disables the ability for users to update their passwords on the user profile page. When set to true, users will be able to change their passwords. When set to false, the password update functionality will be disabled.
Feature: Browser Sessions
- Type:
boolean - Example:
'browser_sessions' => true
This setting enables or disables the management of active browser sessions on the user profile page. When set to true, users will be able to view and manage their active sessions, including the ability to log out from other sessions. When set to false, the browser session management functionality will be disabled.
The log out from other sessions feature allows users to log out from all other active sessions except the current one. This can be useful for security purposes, especially if a user suspects that their account may have been accessed from another device or location. When a user chooses to log out from other sessions, all other active sessions will be invalidated, and the user will be logged out from those sessions immediately. This action is protected by password confirmation to ensure that only the rightful owner of the account can perform it.
Feature: Account Deletion
- Type:
boolean - Example:
'account_deletion' => true
This setting enables or disables the account deletion feature on the user profile page. When set to true, users will have the option to permanently delete their accounts. When set to false, the account deletion functionality will be disabled.
This feature allows users to permanently delete their accounts from the application. When a user chooses to delete their account, all of their data will be removed from the database, and they will no longer be able to log in or access any features of the application. This action is irreversible, so it should be used with caution. To prevent unauthorized account deletions, this action is protected by password confirmation, ensuring that only the rightful owner of the account can perform it.
Feature: Password Confirmation
The authentication scaffolding also includes password confirmation functionality, which is used to verify a user's identity before allowing access to sensitive actions or areas of the application. This feature is enabled by default and does not require any additional configuration.
When a user attempts to access a route that requires password confirmation, they will be prompted to enter their password again. This helps to ensure that the user is indeed the rightful owner of the account before proceeding with the sensitive action.
To protect routes with the password confirmation feature, you can use the password.confirm middleware of Laravel in your route definitions. For example:
Route::middleware(['auth'])->group(function () {
    // Routes that require authentication...

    Route::middleware(['password.confirm'])->group(function () {
        // Add routes that require password confirmation here...
    });
});
Or by assingning the password.confirm middleware to specific routes:
Route::middleware(['auth'])->group(function () {
    // Routes that require authentication...

    Route::get('/sensitive-action', function () {
        // Sensitive action that requires password confirmation...
    })->middleware('password.confirm');
});
Profile Images Configuration
The profile_images configuration section allows you to customize the settings related to user profile images. These settings will only take effect if the Profile Image feature is enabled in the features section of the config/ladmin/auth.php file.
Quick Config Example
'profile_images' => [
    'max_size' => 1024,
    'allowed_mime_types' => [
        'image/jpeg',
        'image/png',
        'image/gif',
    ],
    'storage_disk' => 'public',
    'storage_path' => 'profile-images',
    'default_mode' => 'initials',
]max_size:
- Type:
integer - Example:
'max_size' => 2048
This setting defines the maximum allowed file size for profile image uploads, in kilobytes.
allowed_mime_types:
- Type:
array<string> - Example:
'allowed_mime_types' => ['image/jpeg', 'image/png', 'image/gif']
This setting specifies the allowed MIME types for profile image uploads. You can add or remove MIME types as needed to control the types of images that users can upload.
storage_disk:
- Type:
string - Example:
'storage_disk' => 'public'
This setting defines the storage disk where profile images will be stored. This should correspond to a disk defined in the filesystems.php configuration file of your Laravel application.
storage_path:
- Type:
string - Example:
'storage_path' => 'profile-images'
This setting specifies the directory path within the storage disk where profile images will be stored.
default_mode:
- Type:
string ('identicon'|'robohash'|'initials') - Example:
'default_mode' => 'initials'
This setting defines the default image mode to be used when a user has not uploaded a profile image. Supported modes are:
- identicon: Uses
Gravatarservice withidenticonmode based on user's email. - robohash: Uses
Gravatarservice withrobohashmode based on user's email. - initials: Uses
ui-avatars.comservice to generate an image with the user's initials.
Authentication Actions
The authentication scaffolding allows you to customize the logic of various authentication-related actions by defining your own action classes. These action classes are responsible for handling specific operations during the authentication process, such as creating new users, updating profile information, changing passwords, etc. You can create your own action classes that implement the corresponding Fortify contracts and then register them in the actions section of the config/ladmin/auth.php file. This provides you with the flexibility to add custom logic during authentication operations, such as assigning roles, sending notifications, or integrating with third-party services.
Quick Config Example
use DFSmania\LaradminLte\Actions\Auth\CreateNewUser;
use DFSmania\LaradminLte\Actions\Auth\ResetUserPassword;
use DFSmania\LaradminLte\Actions\Auth\UpdateUserPassword;
use DFSmania\LaradminLte\Actions\Auth\UpdateUserProfileInformation;

'actions' => [
    'create_user' => CreateNewUser::class,
    'reset_password' => ResetUserPassword::class,
    'update_passwords' => UpdateUserPassword::class,
    'update_profile_information' => UpdateUserProfileInformation::class,
],- create_user: This action is responsible for creating new users during the registration process. It should implement the
CreatesNewUserscontract of Fortify. - reset_password: This action handles the logic for resetting user passwords. It should implement the
ResetsUserPasswordscontract of Fortify. - update_passwords: This action manages the logic for updating user passwords. It should implement the
UpdatesUserPasswordscontract of Fortify. - update_profile_information: This action is responsible for updating user profile information. It should implement the
UpdatesUserProfileInformationcontract of Fortify.
Using a Custom Action Class
By creating custom action classes and registering them in the configuration file, you can easily customize the authentication logic to fit the specific needs of your application. For example, you can add additional validation rules, assign default roles to new users, send custom notifications, or integrate with external services during the authentication process. This allows you to have full control over how authentication operations are handled in your application while still leveraging the built-in features of Laravel Fortify and LaradminLTE.
TIP: Reference Default Action Classes
If you ever need to customize the logic for any of the authentication operations, we recommend to inspect the default set of action classes provided by LaradminLTE in your vendor/dfsmania/laradminlte/src/Actions/Auth/ directory. You can use these default action classes as a reference or starting point for creating your own custom action classes.
As an example, we provide a simple implementation of a custom action class for creating new users that assigns a default role to the user upon registration, by using the Spatie Laravel Permission package. You can create this class in the app/Actions directory of your Laravel application.
<?php

namespace App\Actions;

use App\Models\User;
use Illuminate\Support\Facades\Hash;
use Illuminate\Support\Facades\Validator;
use Laravel\Fortify\Contracts\CreatesNewUsers;
use Spatie\Permission\Models\Role;

class CreateNewUser implements CreatesNewUsers
{
    /**
     * Validate and create a newly registered user.
     *
     * @param  array<string, string>  $input
     * @return User
     */
    public function create(array $input): User
    {
        // Validate the input data for creating a new user.

        Validator::make($input, [
            'name' => ['required', 'string', 'max:255'],
            'email' => ['required', 'string', 'email', 'max:255', 'unique:users'],
            'password' => ['required', 'string', 'min:8', 'confirmed'],
        ])->validate();

        // Create the new user with the validated data.

        $user = User::create([
            'name' => $input['name'],
            'email' => $input['email'],
            'password' => Hash::make($input['password']),
        ]);

        // Assign a default role to the user (e.g., "user").

        $user->assignRole('user');

        return $user;
    }
}
Then you can register this custom action class in the actions section of the config/ladmin/auth.php file as shown next:
//use DFSmania\LaradminLte\Actions\Auth\CreateNewUser;
use App\Actions\CreateNewUser as CustomCreateNewUser;

'actions' => [
    'create_user' => CustomCreateNewUser::class,
    // Other actions...
],
Accent Themes
The authentication scaffolding supports various accent themes that can be applied to the authentication pages. These themes change the color scheme of various elements on the pages, such as buttons and links. You can choose from the following predefined accent themes by setting the accent_theme option in the config/ladmin/auth.php file: default, blue, green, red, yellow, skyblue, gray, and black.
You can customize or add new accent themes by modifying the accent_themes section of the configuration file. Each theme defines specific options for different elements on the authentication pages. You can add your own themes by following the structure of the existing ones. This structure includes the following options for each theme:
- background: CSS classes for the header background of the authentication pages.
- button: Bootstrap color class for buttons.
- icon: Bootstrap color class for icons.
- link: Bootstrap color class for links.
Example of Custom Accent Theme
'my_theme' => [
    'background' => 'bg-primary text-light bg-gradient',
    'button' => 'dark',
    'icon' => 'secondary',
    'link' => 'dark',
]